Searchable Map Template with Google Fusion Tables and GitHub Pages
By Derek Eder and Jack Dougherty, last updated May 5, 2015
This tutorial demonstrates how to create your own Searchable Map, using Derek Eder's Template for Google Fusion Tables, and freely host it on the web with GitHub Pages. Explore a working demo with a simple checkbox filter.
Watch the YouTube video tutorial:
The seven basic steps can be completed in your browser:
- A. Create a point map in Google Fusion Tables
- B. Fork a copy of the template to your GitHub account
- C. Create a new GitHub Pages branch to publish to the web
- D. Edit map options in index.html of your gh-pages branch
- E. Create and insert your own Google Fusion Tables API key
- F. Add filter to show legend and selected map points
- G. Save code edits from gh-pages to master branch
GitHub allows users to create one fork of the basic Searchable Map template to your account. To create a second template, or to move and edit multiple files for more advanced versions, download the free GitHub for Mac/Windows tool to clone and sync to your GitHub repositories.
See also Additional MapsLib options
A. Create a point map in Google Fusion Tables
- Create a Fusion Table (here's a great tutorial)
- Make sure at least one column is set to a type of Location and that Fusion Tables has geocoded it
- Your Fusion Table may include at least one column of data about the points on your map, such as numbers (1, 2, 3, etc.) to represent different types. In the map tab, select "change feature styles" to group marker icons into color-coded categories.
- Set the Fusion Table to be publicly visible (via the Share button in the upper right) and make sure 'Allow Download' is enabled.
B. Fork a copy of the template to your GitHub account
The free GitHub platform hosts the Searchable Map Template code repository. Users may "fork" a copy to their own GitHub account to edit and share, and later, to publish a working demo to the web.
- Create a free account on GitHub
- Go to the Searchable Map Template repository on Derek's GitHub account.
- Click "fork" to copy Derek's code repository to your own GitHub account.
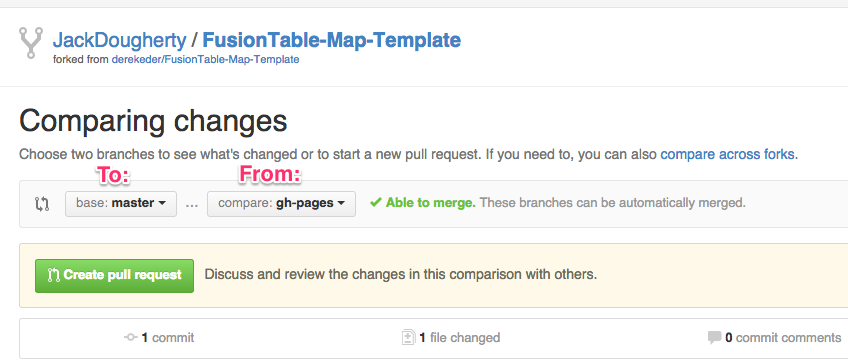
C. Create a new GitHub Pages branch to publish to the web
When you forked Derek's template into your GitHub account, it created two branches: master and gh-pages (abbreviation for GitHub Pages). Keep the master branch, but delete Derek's old gh-pages branch, because it will not work with your account. When you create a new gh-pages branch, it will publish a working demo of the template code to the public web.
- To delete Derek's old gh-pages branch, select the "branches" tab in your GitHub repo, and click the trash can icon to remove it.
- Click the "FusionTable-Map-Template" title to go to the top level of the repository
- Select the branch:master drop-down menu, type the exact phrase "gh-pages" into the textbox, and press enter to create and publish your own GitHub Pages branch to the web.
- The first time you create the GitHub Pages branch, it may take up to 10 minutes to appear on the public web. To view it online, follow this address format in your browser: https://USERNAME.github.io/REPO_NAME.
For example, the map template demo in Derek's gh-pages branch is visible at https://derekeder.github.io/FusionTable-Map-Template.
At this point, when your map template demo becomes visible, it will look identical to Derek's, until you edit the code. While waiting for your demo to appear online, go ahead and edit the map options in your gh-pages branch.
D. Edit map options in index.html of your gh-pages branch
The Searchable Map Template contains several files, but the most essential is index.html, since web browsers will open it by default when they view your GitHub Pages branch. Edit the file to display your Google Fusion Tables map, rather than Derek's, and to modify your map options. All of these steps may be done in your browser.
- Be sure to edit the gh-pages branch of your GitHub repo, rather than the master branch. To switch branches, use the drop-down menu.
- To edit the index.html file, select its name, then click on pencil icon to enter editing mode.
- Select the "soft-wrap" drop-down menu option for a better view of long lines of code.
- Scroll down to around line 120 of index.html to edit these essential map options (see the full list of options)
- fusionTableId - The ID of your Google Fusion Table point map that you created above, located in File => About this table. Select your long TableId and use keyboard commands to copy and paste into the code.)
- googleApiKey - Your personal Google Application Programming Interface (API) key for Fusion Tables. See below how to create your own free key from your Google API Console, then copy and paste in place of Derek's key.
- locationColumn - The name of your location column in your Fusion Table, such as "geometry" or "address" or other.
- map_center - The lat/long where you want to center your map. (Find yours here).
- locationScope - The area where you want to limit searches (set to 'chicago' by default).
- After making these edits, scroll down to the bottom of the page and click "commit changes" to save to your gh-pages branch. Optional, but recommended: Insert a brief description of your code edits.
- Edit the README.MD file to remove the link to Derek's working map demo, and create a link to your own demo in your published GitHub Pages branch, using this browser address format: https://USERNAME.github.io/REPO_NAME
- Click your demo link to view the most recent changes in your GitHub Pages demo map. Be sure to refresh your browser or bypass the cache.
See more details on MapsLib options below.
E. Create and insert your own Google Fusion Tables API key
Create your own API key to replace Derek's in the Map Options section of the index.html file above. By inserting your own key, Google will allow 25,000 requests per day to your Searchable Map.
- Go to the Google APIs Console
- Create a Project and name it "API Project"
- To Enable an API, click APIs > Fusion Table APIs (under "Other popular APIs"
- In the Credentials tab, create a new Public API access key
- Select Browser key
- Leave the Accept Requests from these HTTP referers section blank and click Create
- Find the API KEY, which should look something like
AIzaSyA3FQFrNr5W2OEVmuENqhb2MBB2JabdaOY. Copy and paste into the map options section of the index.html file as shown above.
F. Add filter to show legend and selected points
The Searchable Map Template code can be customized to include a filter, which displays a color-coded interactive legend that allows users to display selected points on the Google Fusion Table map. See the Searchable map template wiki to see several filter examples.
Adding a basic filter requires three steps:
- Set up Fusion Table data column and map point colors
- Insert filter display code into index.html
- Insert filter logic code into maps_lib.js file
This tutorial demonstrates how to insert a basic checkbox filter, using the sample Google Fusion Table data from Derek's template. This filter refers to numerical values (1, 2, 3) in the "type" data column of the Fusion Table, which match three color codes (blue, green, and red) in the Fusion Table Map, which correspond to three labels (City, Private, Hazardous) for types of Chicago recycling stations. Of course, your data will be different, but create a table like the one below to organize your design.
| type | colors | labels |
|---|---|---|
| 1 | blue | City |
| 2 | green | Private |
| 3 | red | Hazardous |
Set up Fusion Table data column and map point colors
- Confirm the values in the "type" column of your Google Fusion Table.
- Confirm the matching color values in your Fusion Table Map.
Insert filter display code into index.html
- Edit the index.html file in your gh-pages branch. Delete Derek's description about filters (rows 59-78) in the template. In its place, copy and paste the checkbox filter display code shown below. Note that "cbType1" means "check box type 1." Customize your titles, labels, and colors to match your own data. Scroll to the bottom of the page to "commit changes" to your gh-pages branch.
<h4>
  Recycling services
</h4>
<ul class='inputs-list unstyled'>
  <li>
    <label class='checkbox inline'>
      <input type='checkbox' id='cbType1' />
      <span class='filter-box filter-blue'></span>
      City drop-off location
    </label>
  </li>
  <li>
    <label class='checkbox inline'>
      <input type='checkbox' id='cbType2' />
      <span class='filter-box filter-green'></span>
      Private business
    </label>
  </li>
  <li>
    <label class='checkbox inline'>
      <input type='checkbox' id='cbType3' />
      <span class='filter-box filter-red'></span>
      Hazardous materials
    </label>
  </li>
</ul>
Insert filter logic code into maps_lib.js file
The maps_lib.js file (which appears in the js, or JavaScript folder) contains the core code that operates the Searchable Map template. Adding a filter with logical statements (matching those in the index.html and the Fusion Table) allows users to turn on/off selected point maps. Numerical filters work best, but see the wiki filter page for examples with text strings.
- In your gh-pages branch, edit the maps_lib.js file, located in the js folder.
- Copy and paste the filter logic shown below into the "custom filters" section of the code, usually between lines 165-166 of the template. Note that "cbType1" and its numerical value (1) should match your index.html file and Fusion Table. Scroll down to commit changes to your gh-pages branch.
var type_column = "'type'";
var searchType = type_column + " IN (-1,";
if ( $("#cbType1").is(':checked')) searchType += "1,";
if ( $("#cbType2").is(':checked')) searchType += "2,";
if ( $("#cbType3").is(':checked')) searchType += "3,";
self.whereClause += " AND " + searchType.slice(0, searchType.length - 1) + ")";
Hints:
- The data column in the template is named "type." But if your Fusion Table column name has spaces in it, make sure to surround it with single quotes as shown.
- The number of filter colors/labels/types can be expanded beyond the 3 shown above by adding lines of code. Fusion Tables and the Searchable Map Template support 5 large markers (blue, red, green, yellow, purple), and Fusion Tables supports 5 additional small markers with the same colors.
- Modify additional text and links in the index.html file to tell the story of your map and its sources to viewers.
- Modify your README.md file in your gh-pages branch to insert a link to your published demo site, following this web address format: https://USERNAME.github.io/REPO_NAME
G. Save code edits from gh-pages to master branch
After making edits to your GitHub Pages branch and viewing your published map on the web, save a copy of the entire template with a "pull request" to your master branch. Use the gh-pages branch for testing new features on your live web demo site, and use the master branch for safekeeping a good copy of your working code.
- In the right-hand column of the top-level of your GitHub repository, click "Pull Request"
- Click the green "New Pull Request" button.
- In the drop-down menus, select YOUR base and YOUR branches (not Derek's base). In this example, the goal is to send a pull request TO your master branch FROM your gh-pages branch.
- Click the green Create Pull Request button. Give your pull request a name (such as Update index.html).
- Click the next green Create Pull Request Button.
- If GitHub decides it can automatically merge the gh-pages branch edits into the master branch, a green Merge Pull Request button will appear. Click it.
- Click the green Confirm Merge button.
- Your Pull Request should be successfully completed. But do NOT delete the gh-pages branch unless you really wish to do so.
H. Clone and sync additional templates with GitHub for Mac/Win
GitHub allows users to create one fork of the basic Searchable Map template repository. To create a second template, or to move and edit multiple files for more advanced versions, download the GitHub for Mac/Windows tool.
- Download the free tool: GitHub for Mac or GitHub for Windows
- In the Searchable Map Template in GitHub, click Clone and save to your hard drive
- In your GitHub browser, create a new repository for your second template, and select options to create a README.MD and license (recommended: MIT).
- Clone your second template repository to your hard drive
- In your hard drive, copy and paste the files from the cloned Searchable Map Template to your cloned second template. Replace the existing README.MD and license files.
- In your GitHub for Mac/Windows tool, Commit and Sync your second template to your GitHub online account. Title the commit before clicking the button.
- Refresh your browser to view the synced files in your GitHub account. Start at the top of these directions to remove an old gh-pages branch, create a new gh-pages branch, and edit files.
Additional MapsLib options
You can configure your map by passing in a dictionary of options when you create a new MapsLib instance in index.html or index_iframe.html. Here's an example:
var myMap = new MapsLib({
  fusionTableId:      "1m4Ez9xyTGfY2CU6O-UgEcPzlS0rnzLU93e4Faa0",
  googleApiKey:       "AIzaSyA3FQFrNr5W2OEVmuENqhb2MBB2JabdaOY",
  locationColumn:     "geometry",
  map_center:         [41.8781136, -87.66677856445312],
  locationScope:      "chicago"
});
| Option | Default value | Notes |
|---|---|---|
| fusionTableId | Required. Table ID of your Fusion Table (found under File => About). | |
| googleApiKey | Required. Found at https://console.developers.google.com/ The key provided in this template is for demonstration purposes only. Please register your own. | |
| map_centroid | Required. Center [latitude, longitude] that your map defaults to. | |
| recordName | record | Used for showing the count of results. |
| recordNamePlural | records | |
| searchRadius | 805 | Default search radius. Defined in meters. Default is 1/2 mile. |
| locationColumn | geometry | Name of the location column in your Fusion Table. If your location column name has spaces in it, surround it with single quotes like this "'my location'". |
| locationScope | Appended to all address searches to keep results within a geographic area. | |
| defaultZoom | 11 | Default zoom level when map is loaded (bigger is more zoomed in). |
| addrMarkerImage | images/blue-pushpin.png | Image used to identify your address search on the map. Setting it to blank ("") will hide the marker. |

Data Visualization for All by Jack Dougherty and contributors is licensed under a Creative Commons Attribution-NonCommercial 4.0 International License. You may freely share and modify this content for non-commercial purposes, with a source credit to http://DataVizBook.org.